Schlagwort-Archive: Vincent

Black and Gold Flower Nails with Born Pretty Nail Vinyls

Hallo Ihr Lieben,

Hi there,

heute das letzte Produkt aus meinem Testpäckchen von Born Pretty Store und wieder eine Nail Art Technik, die ganz neu für mich ist: Nail Vinyls. Ich habe schon Hunderte von wunderschönen Manis mit Nail Vinyls gesehen und war sehr gespannt, ob ich das auch hinkriege. Die JV220 Vinyls aus dem Sortiment von Born Pretty haben mir am besten gefallen. Die erste Überraschung kam beim Auspacken, ich habe mir die Nail Vinyls viel kleiner vorgestellt. Wer eher kürzere Nägel hat, sollte beachten, dass die Motive recht groß sind, die Größe einer Schablone ist 3,2 x 2,5 cm.

today the last product of my test packet from Born Pretty Store and again a nail art technique, that is completely new for me: nail vinyls. I’ve seen hundreds of beautiful manis with nail vinyls and was very curious to see, if I can do it too.  From the assortment of Born Pretty Store I liked JV220 vinyls the best. The first surprise came when unpacking, I thought, nail vinyls would be much smaller. If you have shorter nails, please note, that the motives are quite large, the size of a stencil is 3,2 x 2,5 cm.

Born Pretty Nail Vinyls JV220 stampoholicsdiaries.com

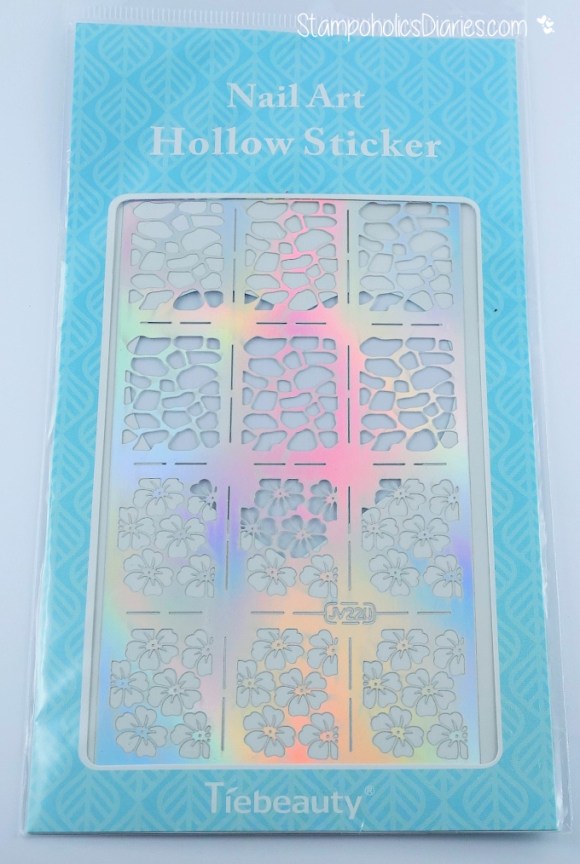
Irritiert war ich auch von der Beschreibung auf der Verpackung und dachte zuerst, ich habe das falsche Produkt bekommen 🙂 . Sticker? Transparent Gel? UV?

 I was also confused by the description on the packaging and initially thought, I got the wrong product :-). Sticker? Transparent Gel? UV?

Born Pretty Nail Vinyls JV220

Erst nach dem zweiten Blick auf die Born Pretty Store Seite wurde mir klar, dass man das Produkt sowohl als Holo-Aufkleber, als auch als Nail Vinyls nutzen kann.

Only after a second look at the Born Pretty Store page I realized, that you can use the product both: as holo sticker as well as nail vinyls.

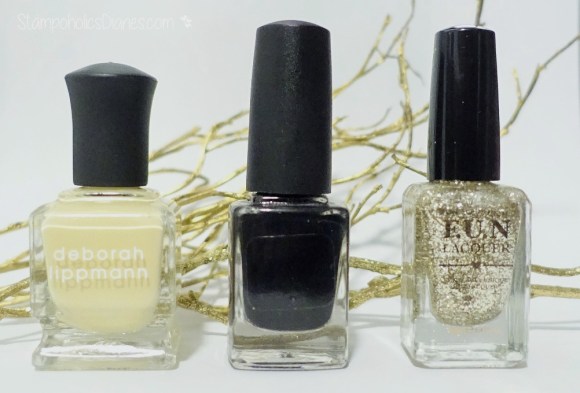
Für das Design habe ich drei Lacke ausgesucht: den goldenen „Pay Day“ von FUN Lacquer, den schwarzen „Vincent“ von Colors by LLarowe  und den hellgelben „Build me Up Buttercup“ von Deborah Lippmann.

For the design I chose three nail polishes: the golden „Pay Day“ (FUN Lacquer), black „Vincent“ (Colors by LLarowe) and the pale yellow „Build me up Buttercup“ (Deborah Lippmann).

Fun Lacquer Pay Day, Deborah Lippmann Build Me Up Butter Cup, Colors By Llariwe Vincent stampoholicsdiaries

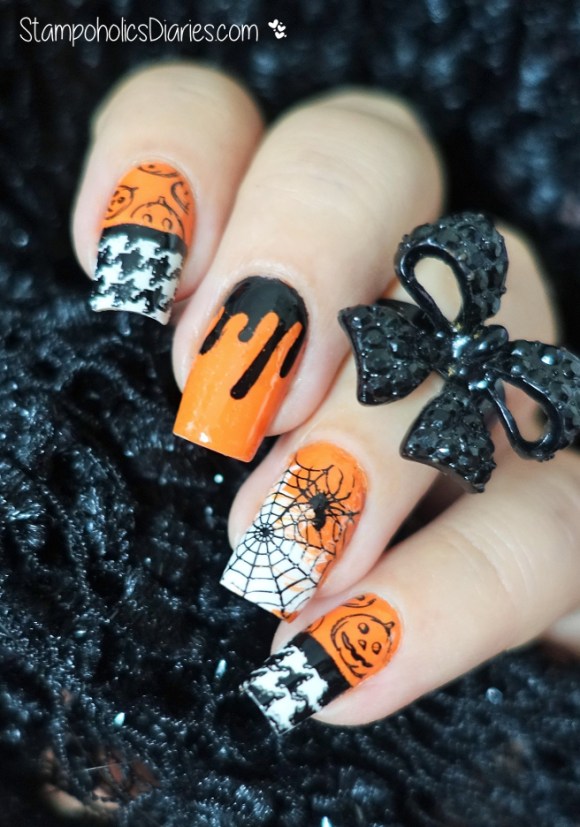
Zuerst habe ich den Ringfinger schwarz lackiert, gut trocknen lassen, einen Nail Vinyl vom Bogen ausgeschnitten, diesen von der Transparentfolie gelöst und auf den Nagel geklebt. Im Anschluss habe ich den gelben Lack aufgetragen und den Nail Vinyl vorsichtig abgezogen. Es hat geklappt, das Blüten-Muster hatte ich auf dem Nagel.

First, I painted the ring finger black, let it dry, cut out a nail vinyl from the sheet, removed the transparent film and sticked it on the nail. Then I applied the yellow polish and gently removed the stencil. It worked, and I had the flower print on the nail.

Auf dem Mittelfinger habe ich mit Hilfe von ein paar Nail Art Stripes Streifen gemacht und die anderen Nägel mit „Pay Day“ lackiert – meinem Lacktraum in Gold.

On the middle finger I made some stripes with the help of a few nail art stripes and painted the other nails with „Pay Day“ – my dream nail polish in gold.

Fun Lacquer Pay Day, Deborah Lippmann Build Me Up Butter Cup, Colors By Llariwe Vincent, Nail Vinyls Born Pretty Store

Main Fazit: Nail Vinyls sind eine nette Abwechslung zum Stamping, und es wird bestimmt nicht mein letztes Nail Vinyl Design sein. Man kann mit unterschiedlichen Texturen spielen (Glitzer über Matte Finish stelle ich mir traumhaft vor) und man braucht gar keine zusätzlichen Utensilien außer Nagellack. Als Nachteil sehe ich, dass man die Vinyls nur einmal verwenden kann.
Bei JV220 Nail Vinyls bekommt man zum Preis von $3.99 inkl. Versand.einen Bogen bestehend aus insgesamt 12 Schablonen mit 2 unterschiedlichen Mustern, d.h. entweder mixt man beide Muster an 10 Fingern oder man setzt mit Nail Vinyls einzelne Akzente (wie in meinem Fall). Hoffe, es gefällt Euch.
My conclusion: nail vinyls are a nice alternative to stamping, and it won’t be my last nail vinyl design. You can play with different textures (I think, glitter over matte will look fantastic) and you do not need any additional utensils except nail polish. Their disadvantage in my opinion is, that you can use the vinyls only once.
JV220 Nail Vinyls cost $ 3.99 incl. shipping. The sheet consists of 12 stencils with 2 different patterns. It means, you can either mix both patterns on 10 fingers or your set with nail vinyls individual accents (as in my case). I hope, you like it.
Verwendete Produkte / Products used:
Born Pretty Store JV220 Nail Vinyls / Holo Sticker
Fun Lacquer „Pay Day“
Deborah Lippmann „Build me up Buttercup“
Colors by Llarowe „Vincent“
Nail Art Tape
Viele Grüße / Kind regards,
Natascha

P.S. mit dem Code ENSQ10 bekommt Ihr 10% Rabatt auf Euren Einkauf. In der Nail Art Abteilung von Born Pretty Store findet Ihr weitere schöne Schablonen und Nageldeko.

P.S. with the code ENSQ10 you will receive 10% discount on your purchase. There are further beautiful stamping plates and nail decorations in the Nail Art Department of Born Pretty Store.

ENSQ10

Getaggt mit , , , , , , , , , , , , , , , , , ,

Halloween Nails with China Glaze, Essence, Colors by Llarowe and MoYou

Hallo Ihr Lieben,

Hi there,

passend zum heutigen Gruselabend ein kleines Halloween Nail Design. In Hauptrollen sind hier: „33 wild white ways“ von Essence, „Vincent“ von Colors by Llarowe (meine aktuellen Lieblinge, wenn es um schwarz-weiße Nailarts geht) und  der orangefarbene „Stoked to be soaked“ von China Glaze – seit zwei Jahren mein ständiger Begleiter in der Halloweenzeit.

suitable for today’s scary evening a little Halloween nail design. In leading roles there are: „33 wild white ways“  by Essence, „Vincent“ by Colors by Llarowe (my current favorites when it comes to black and white nailarts) and the orange „Stoked to be soaked“ by China Glaze – for two years my constant companion in the Halloween time.

China Glaze Stoked to be soakes, Essence wild white ways, Colors by llarowe Vincent

Hier eine kurze Anleitung, wie das Design entstand…

Here is a brief description of how I created the design …

Den Daumen, den Zeige- und den kleinen Finger habe ich zuerst mit „wild white ways“ lackiert, trocknen lassen, mit dem Tesafilm zur Hälfte abgeklebt, mit dem Hahnentrittmuster von der MoYou Schablone Pro Collection – 04 gestampt (Stamping Lack – „Stamp me black“ von Essence) und den Tesafilm entfernt. Danach war die zweite Nagelhälfte an der Reihe. Den gestampten Bereich habe ich mit dem Tesafilm abgeklebt, die andere freie Hälfte mit „Stoked to be soaked“ lackiert, trocknen lassen, mit dem Kürbismuster von der MoYou Schablone Festive Collection 16 dekoriert und den Tesafilm entfernt. Als Grenze zwischen beiden Mustern habe ich eine schwarze Linie mit dem „Vincent“ durchgezogen.

First, I painted the thumb, the index and the little finger with „wild white ways“, let it dry, taped one half with scotch tape, stamped on the other half the houndstooth pattern from MoYou Stamping plate Pro Collection – 04 (Stamping polish – „Stamp me black“ by Essence) and removed the scotch tape. Then I taped with scotch tape the already stamped area, painted the other stamping free half of the nail with „Stoked to be soaked“, let it dry, „decorated “ it with pumpkin pattern from the MoYou stamping plate Festive Collection 16 and removed the tape. As a boundary between the two patterns I pulled a black line with the „Vincent“.

Den Mittel- und den Ringfinger habe ich in Orange lackiert. Noch bevor der Lack trocken war, kam auf den Ringfinger ein weißer Klecks von „wild white ways“, den ich mit Hilfe eines Zahnstochers mit dem orangefarbenen Lack „verwischt“ habe.  Die beiden Halloween Stamping Muster kamen von der oben genannten MoYou Schablone Festive Collection 16.

After that I  painted the middle and the ring finger in orange. Even before the polish was dry, a white blob of „wild white ways“ came to the ring finger, and I „smudged“ it into the orange polish by the help of a toothpick. Both Halloween stamping patterns came from the aforementioned MoYou plate Festive Collection 16.

Hoffe, mein Halloween Mix and Match gefällt Euch.

I hope, you like my Halloween Mix and Match.

Halloween Nails China Glaze Stoked to be soakes, MoYou Festive Collection 16, Pro Collection 04

Verwendete Produkte / Products used:

China Glaze „Stoked to be soaked“
Essence „33 wild white ways“
Colors by Llarowe „Vincent“
Stamping polish Essence „Stamp me black“
Stamping plate MoYou Pro Collection – 04
Stamping plate MoYou Festive Collection 16
Tape

Happy Halloween!!! 🙂

pumpkin-217254_1280

Liebe Grüße / Kind regards,

Natascha

Getaggt mit , , , , , , , , , , , , , , , , , , ,

„Mr. & Mrs.“ Nails with El Corazon, Colors by Llarowe, L’Oréal, Mundo de Unas and MJ

Hallo Ihr Lieben,

Hi there,

ich habe Euch schon ein paar mal von der Matte & Shine Kollektion von El Corazon vorgeschwärmt, und meine Schwärmerei nimmt kein Ende :-). Der Lack Nr. 173 aus dieser Serie hat mich genauso wie die anderen ausprobierten absolut begeistert. Es ist ein sehr festlicher, schimmernder, in 2 Schichten deckender weißer Nagellack, der mich an Perlen und wunderschöne Ball- und Brautkleider erinnert,

I raved several times about matte & shine collection by El Corazon, and my enthusiasm is endless :-). The nail polish 173 absolutely thrilled me just like the others, which I tried out from this series . It’s a very festive, shimmery, covering in 2 layers white nail polish, which reminds me of pearls and beautiful ball and wedding dresses.

El Corazon Matte & Shine 173 StampoholicsDiaries.com

Kein Wunder, dass ich an die MJ Wedding Stamping Schablone gedacht habe und die weiße Schönheit von El Corazon mit dem  schwarzen „Vincent“ von Colors by Llarowe verkuppelt habe. Gegensätze ziehen sich ja bekanntlich an :-).

No wonder, that I thought about the MJ Wedding image plate and hooked up the white beauty by El Corazon with the black „Vincent“ of Colors by Llarowe. Opposites attract, you know :-).

MyOnlineShop MJ Wedding stamping plate StampoholicsDiaries.com

Herausgekommen ist dabei dieses Design. Die verwendeten Stamping Lacke sind beide von Mundo de Unas: „1 White“ und „2 Black“. Den Ring- und den kleinen Finger habe ich mit dem  Topcoat von L’Oréal „195 Matte“ mattiert. Hoffe, es gefällt Euch.

The result became this nail design. The stamping polishes I used are both by Mundo de Unas: „1 White“ and „2 Black“.  I also mattified the ring and the little finger with the topcoat by L’Oréal „195 Matte“. I hope, you like it.

El Corazon Matte & Shine 173, MJ wedding plate StampoholicsDiaries

Verwendete Produkte / Products used:

El Corazon Matte and Shine Effect 173
Colors by Llarowe „Vincent“
L’Oréal Topcoat „195 Matte“
Mundo de Unas Stamping polish „1 White“
Mundo de Unas Stamping polish „2 Black“
Stamping Plate MJ „Wedding“

Liebe Grüße / Kind regards,

Natascha

Getaggt mit , , , , , , , , , , , , , , , , , ,

Vintage Car Nails with Colors by Llarowe, P2, Mundo de Unas, Essence and Bundle Monster

Hallo Ihr Lieben,

Hi there,

als Bundle Monster vor einigen Monaten „Time Machine“ Kollektion released hat, war ich hin und weg. Richtig tolle Stamping Muster! Ich habe bei keinem anderen Stampingplattenhersteller  ähnliche Images gesehen. Heute zeige ich ein einfaches Nail Stamping Design mit der Schablone BM-XL135 „Gilded Revolution“ aus dieser Serie.

as Bundle Monster released „Time Machine“ collection several months ago, I was blown away. Really great stamping patterns! I have not seen similar images by any other stamping plate manufacturer. Today I ‚ll show a simple nail stamping design with BM-XL135 plate from this series named „Gilded revolution“ .

Bundle Monster Time Machine BM-XL 135 stampoholicsdiaries.com

Hauptfarben in diesem Design sind Schwarz und Peach. Der schwarze Lack ist „Vincent“ von Colors by Llarowe. Er gefällt mir super gut: deckt in einer Schicht, ist ein richtig dunkles Creme-Schwarz und trocknet schnell. Mit dem pfirsichfarbenen 012 „marry me!“ von P2 hatte ich mehr Schwierigkeiten beim Auftragen. Die zarte Farbe ist ohne Zweifel wunderschön und deswegen benutze ich diesen Nagellack schon nicht zum ersten Mal, aber man braucht Zeit und drei Schichten Lack, um ein deckendes und gleichmäßiges Ergebnis zu bekommen.

Main colors in this design are black and peach. The black nail polish is „Vincent“ by Colors by Llarowe. I like it very  much: it covers in one layer, is a really dark cream-black and dries quickly.  I had more difficulties applying peach-colored 012 „marry me!“ by P2 . The delicate color is undoubtedly beautiful and that’s why I use this nail polish not for the first time, but you need time and three coats of nail polish to get an opaque and even result.

ColorsbyLlarowe Vincent, P2 marry me StampoholicsDiaries.com

Ich konnte mich schwer entscheiden, welches Muster von der Schablone ich für das Stamping wähle, da sie mir alle gefallen. Geworden sind es dann die Retro-Autos und das Motiv mit den Bahngleisen. Gestampt habe ich mit dem „Stamp me“ black von Essence und dem 31 „Peach“ von Mundo de Unas.

It was hard to decide, which pattern from the plate I will use for stamping, because I like them all.  Finally I went for retro cars and the image with the tracks. I stamped the images with „Stamp me“ black by Essence and 31 „Peach“ by Mundo de Unas.

Hoffe, es gefällt Euch!

Hope, you like it!

Vintage Cars ColorsbyLlarowe Vincent, P2 marry me, Bundle Monster BM XL-135

Verwendete Produkte / Products used:

Colors by Llarowe „Vincent“
P2 012 „marry me!“
Stamping polish Essence „Stamp me“ black
Stamping polish Mundo de Unas 31 „peach“
Stamping plate Bundle Monster BM-XL135

Liebe Grüße / Kind regards,

Natascha

Getaggt mit , , , , , , , , , , , , , , , ,